Battery switch on travel trailer function is crucial for managing your RV’s power. Understanding how it works—from choosing the right type of switch to troubleshooting common problems—is key to keeping your lights on and appliances running smoothly. This guide breaks down everything you need to know about your travel trailer’s battery switch, from its basic operation to advanced integration with solar panels and inverters.
We’ll cover different switch types, safe connection procedures, and essential maintenance tips to keep your system running efficiently and reliably.
This detailed explanation will cover various aspects of the battery switch, including its different types, functionality within your RV’s electrical system, safe connection and disconnection methods, troubleshooting tips for common issues, maintenance practices for optimal performance, and its interaction with solar panels and inverters. We aim to empower you with the knowledge to confidently manage your travel trailer’s power system.
Battery Switch Types in Travel Trailers
Choosing the right battery switch for your travel trailer is crucial for managing power and protecting your electrical system. Different types offer varying levels of control and safety features, making understanding their differences essential for a smooth and safe RVing experience. This section will Artikel the common types, their advantages, disadvantages, and best use cases.
Single-Pole Battery Switches
A single-pole battery switch is the simplest type. It’s essentially an on/off switch for a single battery. This means you can disconnect one battery at a time from the trailer’s electrical system. They’re generally inexpensive and easy to install.
| Feature | Single-Pole | Double-Pole | Double-Pole Double-Throw |
|---|---|---|---|
| Number of Batteries Controlled | One | Two | Two (with switching capability) |
| Complexity | Simple | Moderate | More Complex |
| Cost | Low | Medium | High |
| Application Suitability | Small trailers, single battery systems | Most trailers with two batteries | Trailers needing to switch between battery banks |
Double-Pole Battery Switches
Double-pole switches control two batteries simultaneously. Flipping the switch connects or disconnects both batteries at once. This provides a convenient way to manage power from two house batteries, offering more power for appliances and less frequent charging needs.
Double-Pole Double-Throw Battery Switches
This type allows you to switch between two battery banks, or even connect both simultaneously. This is useful for trailers with separate house and starting batteries or for those wanting to isolate a specific battery bank for maintenance or charging. While offering increased control, they’re more complex to install and typically more expensive. For instance, you might use one bank for house power and another for running a winch or other high-draw appliance, switching between them as needed.
Function and Purpose of the Battery Switch
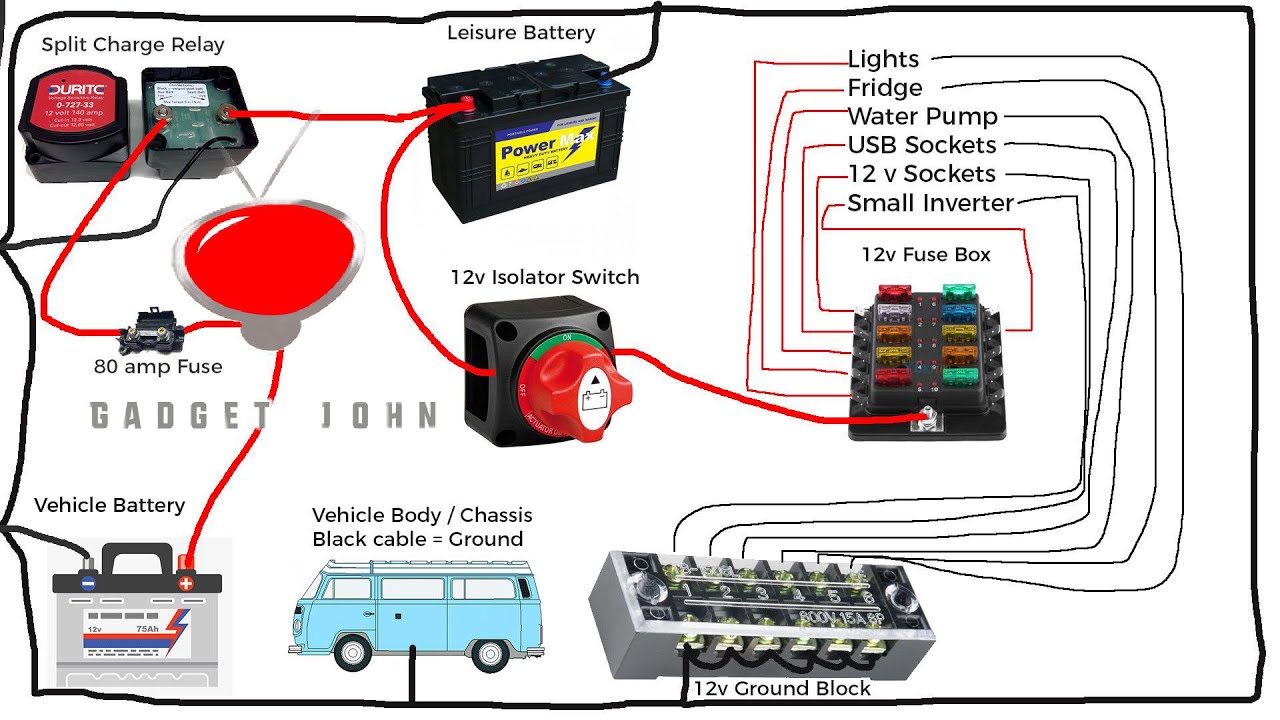
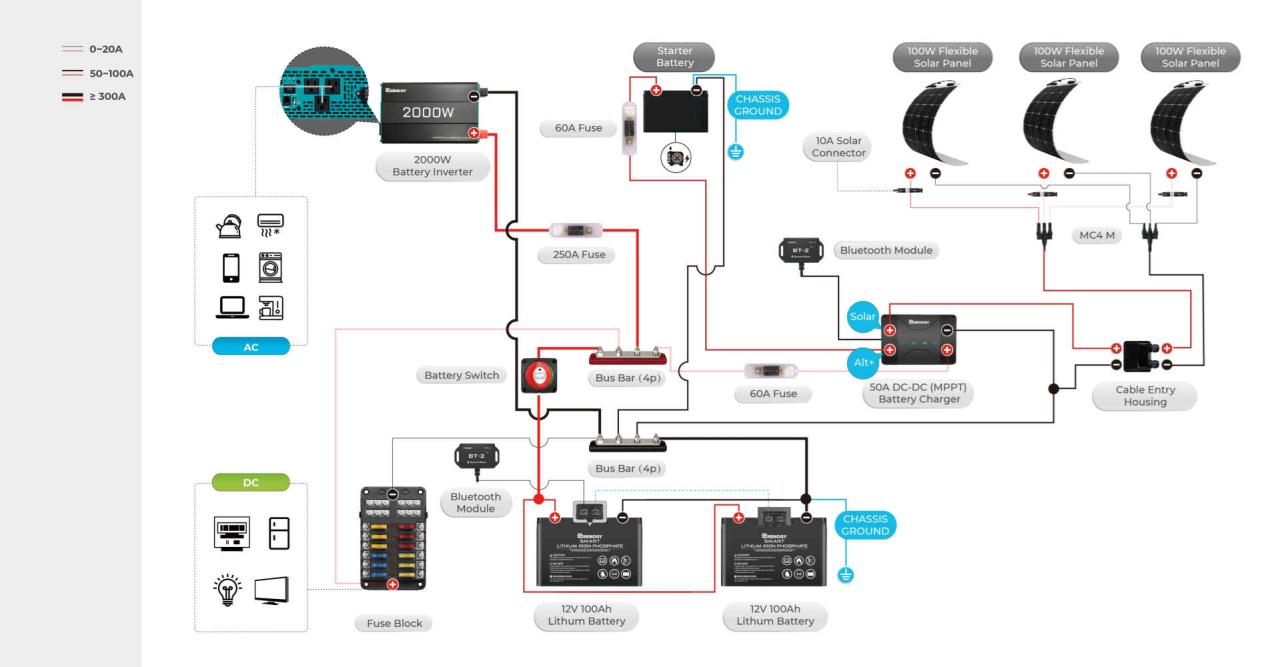
The battery switch in your travel trailer is a crucial component that controls the flow of power from your house batteries to the various electrical systems within your RV. Think of it as a central on/off switch, but with more sophisticated capabilities than a simple light switch. It allows you to isolate your house batteries from the rest of the electrical system when needed, preventing accidental drain and protecting your battery investment.This switch manages the power flow between your trailer’s 12-volt house batteries and the charging system, whether that’s from your tow vehicle, a shore power connection, or solar panels.
It acts as a gatekeeper, ensuring power reaches your appliances and lights only when you want it to, and preventing unwanted discharge when your trailer is stored or unused for extended periods.
Impact of a Faulty Battery Switch
A malfunctioning battery switch can have significant consequences for your travel trailer’s functionality. For example, if the switch is stuck in the “off” position, none of your 12-volt appliances – lights, water pump, refrigerator (if 12V), or even your furnace fan – will work. Conversely, if the switch is stuck in the “on” position, your house batteries could drain completely even when the trailer is not in use, leaving you stranded without power.
This can lead to significant inconvenience and potentially expensive repairs to replace damaged batteries. In some cases, a faulty switch might not fully disconnect the batteries, leading to a slow, parasitic drain that depletes your battery bank over time. This subtle drain might not be immediately noticeable, but it can result in a dead battery when you’re ready to use your trailer.
Planning a trip? Don’t forget to sort out your travel insurance! Check out Aon travel insurance for comprehensive coverage. Then, if you’re an audiophile, make sure you’ve got the right gear; a great audiophile travel setup can make all the difference to enjoying your music on the go. Seriously, good tunes enhance any adventure.
So, get insured and get your audio sorted before you go!
Regularly checking your battery switch and ensuring it functions correctly is essential for preventing these issues.
So, you’re planning a trip? Awesome! First things first: get yourself sorted with travel insurance. Check out Aon travel insurance for some solid options; you’ll want peace of mind knowing you’re covered. Then, if you’re an audiophile like me, don’t forget your tunes! Consider building a killer audiophile travel setup – because even on vacation, good sound is essential.
Seriously, it’ll make your whole trip that much better.
Connecting and Disconnecting Batteries
Properly connecting and disconnecting your travel trailer’s batteries is crucial for safety and to prevent damage to your electrical system. A battery switch acts as a central control point, making this process much safer and easier than working directly with battery terminals. Always remember to prioritize safety when handling batteries.
Before you begin any work on your battery system, always make sure the battery switch is in the “OFF” position. This prevents accidental shorts and protects you from electrical shocks. Remember to wear safety glasses to protect your eyes from any potential splashing of battery acid.
Connecting Batteries
Connecting your batteries through the battery switch is straightforward, but it’s essential to follow the steps carefully. This ensures that your system is properly energized and ready to power your appliances and accessories.
- Step 1: Verify the Switch Position: Begin by ensuring that your battery switch is in the “OFF” position. This will be clearly indicated on the switch itself; often, it will have an “OFF,” “ON,” or similar markings. Visually inspect the switch to confirm it’s in the “OFF” position. The switch lever will usually be pointing towards the “OFF” marking, often accompanied by a noticeable click sound when it’s fully engaged.
- Step 2: Locate the Battery Switch: Your battery switch is typically located near your battery bank, often in a readily accessible compartment. It’s usually a robust, weatherproof switch, sometimes housed in a protective enclosure. It might be a simple rocker switch or a more complex multi-position switch.
- Step 3: Turn the Switch to “ON”: Carefully move the battery switch lever to the “ON” position. You should feel a distinct click or resistance as the switch engages. Observe the switch lever to ensure it’s fully and securely in the “ON” position.
- Step 4: Check System Operation: Once the switch is in the “ON” position, test your system by turning on a light or other low-draw appliance to verify that power is flowing correctly. If everything works as expected, your batteries are successfully connected.
Disconnecting Batteries
Disconnecting your batteries is equally important, especially for extended periods of storage or when performing maintenance. This process prevents accidental discharge and protects your batteries and electrical system from potential damage.
- Step 1: Turn Off Appliances: Before disconnecting the batteries, make sure to turn off all appliances and devices connected to the trailer’s electrical system. This prevents any unexpected power surges or drains.
- Step 2: Locate the Battery Switch: Again, locate your battery switch near the battery bank. Ensure that you have a clear view of the switch to avoid any mistakes.
- Step 3: Turn the Switch to “OFF”: Carefully move the battery switch lever to the “OFF” position. As before, you’ll feel a distinct click or resistance as the switch disengages. Visually verify that the lever is firmly in the “OFF” position.
- Step 4: Verify Disconnection: After turning the switch to “OFF,” you can optionally test the system by trying to turn on an appliance; it should not power on, confirming that the batteries are disconnected. This step helps ensure the battery switch is functioning correctly.
Troubleshooting Common Battery Switch Issues: Battery Switch On Travel Trailer Function
Your travel trailer’s battery switch is a crucial component, ensuring you can easily manage your power sources. Problems with this switch can leave you stranded without power, so understanding common issues and how to fix them is essential for any RV owner. This section will cover some of the most frequent problems encountered and provide straightforward solutions.
Identifying Common Battery Switch Problems
Several issues can arise with your travel trailer’s battery switch, often stemming from simple problems easily resolved with basic tools and knowledge. These problems range from simple corrosion to more complex internal failures. Understanding the symptoms will help you quickly diagnose and solve the problem. Ignoring these issues can lead to more significant problems down the road, potentially damaging your batteries or other electrical components.
Diagnosing Battery Switch Problems
Diagnosing problems with your battery switch usually starts with a visual inspection. Look closely for signs of corrosion around the terminals, loose or damaged wires, and any physical damage to the switch itself. Corrosion appears as a greenish-white or bluish-white buildup on the terminals and wires. Loose connections might be obvious, but you might need to wiggle the wires to check for poor contact.
If a visual inspection doesn’t reveal the problem, simple electrical tests can help pinpoint the issue. A multimeter can be used to check for voltage at the switch terminals and at the battery terminals to determine if the switch is properly connecting the circuit.
Resolving Battery Switch Problems
Once you’ve identified the problem, the solution is often straightforward. Corrosion can be cleaned using a wire brush and baking soda paste, followed by a protective coating of dielectric grease. Loose connections can be tightened, but if the wires are damaged, they need to be replaced. Internal failures in the switch itself usually require replacement of the entire switch.
Remember to always disconnect the battery’s negative terminal before working on any electrical components.
Summary of Common Battery Switch Problems, Causes, and Solutions, Battery switch on travel trailer function
| Problem | Cause | Solution |
|---|---|---|
| Corrosion on terminals | Exposure to moisture and elements | Clean terminals with wire brush and baking soda paste; apply dielectric grease. |
| Loose connections | Vibration, improper installation | Tighten connections; replace damaged wires. |
| Switch failure | Internal component failure, age | Replace the battery switch. |
| No power to appliances | Incorrect switch position, blown fuse | Verify switch position; check and replace fuses as needed. |
Mastering your travel trailer’s battery switch is more than just flipping a switch; it’s about understanding the heart of your RV’s electrical system. By understanding the different types of switches, their functions, and how to troubleshoot common issues, you can ensure a reliable power supply for your adventures. Regular maintenance and a proactive approach to potential problems will extend the life of your battery switch and keep you powered up on the road.
So, get to know your battery switch, and enjoy worry-free power on your next trip!
FAQ Overview
What happens if my battery switch is left on while the trailer is not in use?
Leaving your battery switch on while your trailer is unused can drain your batteries over time, especially if you have parasitic loads (small appliances drawing power even when turned off). It’s best to turn it off when not using the trailer for extended periods.
How often should I clean my battery terminals and connections?
Clean your battery terminals and connections at least twice a year, or more often if you notice corrosion. Regular cleaning prevents power loss and extends the life of your batteries and switch.
Can I use any type of battery switch in my travel trailer?
No, the appropriate battery switch depends on your trailer’s electrical system and battery configuration. Using the wrong type can damage your system or create safety hazards. Consult your owner’s manual or a qualified RV technician.
My battery switch feels hot to the touch. Is this normal?
A slightly warm battery switch is normal, but excessive heat indicates a problem. This could be due to loose connections, high current draw, or a faulty switch. Turn off the switch immediately and have it checked by a professional.
